


Step-by-step instructions for building a plastic cellar in the house
If you’re looking for a cost-effective and practical solution for additional storage space, building your own DIY plastic cellar could be the answer.
With a little bit of planning and some basic tools, you can create a sturdy and functional plastic cellar in your backyard. In this article, we’ll walk you through the steps to build your own DIY plastic cellar.
Step 1: Choose the Location and Size of Your Cellar Before you start building, you need to decide where you want to locate your plastic cellar. It should be in a flat and level area, away from trees and bushes that could potentially damage it. Once you’ve chosen the location, determine the size of your cellar based on your storage needs. Plastic cellars come in different sizes, so choose the one that best fits your needs.
Step 2: Prepare the Site Once you’ve chosen the location and size of your plastic cellar, it’s time to prepare the site. Start by removing any grass, weeds, or debris from the area where you want to install the cellar. Use a shovel to level the ground and make it as flat as possible. If necessary, use a tamper to compact the soil.
Step 3: Build the Foundation A proper foundation is essential to ensure that your plastic cellar is stable and secure. You can either use a concrete slab or a gravel base. For a concrete slab, dig a hole slightly larger than the size of your cellar and pour the concrete. For a gravel base, fill the hole with gravel and compact it using a tamper.
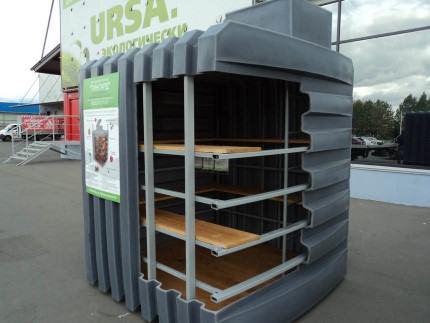
Step 4: Assemble the Plastic Cellar Once the foundation is ready, it’s time to assemble your plastic cellar. Follow the manufacturer’s instructions carefully to ensure that you assemble the cellar correctly. Most plastic cellars come with interlocking panels that snap together easily. You may need some assistance to help you hold the panels in place as you connect them.
Step 5: Install the Door and Ventilation After you’ve assembled the plastic cellar, it’s time to install the door and ventilation. Most plastic cellars come with pre-drilled holes for the door and ventilation, so all you need to do is attach them according to the manufacturer’s instructions. It’s important to have proper ventilation to prevent moisture buildup, which can lead to mold and mildew growth.
Step 6: Add Finishing Touches Once the cellar is fully assembled, you can add finishing touches such as shelves or hooks to optimize your storage space. You may also want to consider adding insulation to help regulate the temperature inside the cellar and prevent damage to your stored items.
In conclusion, building your own DIY plastic cellar is a simple and cost-effective way to add storage space to your home. By following these steps, you can create a sturdy and functional plastic cellar that will protect your stored items from moisture and mold. Don’t hesitate to contact a professional if you need help or have any questions along the way.


Оставить комментарий